> For the complete documentation index, see [llms.txt](https://docs.k3-labs.com/introduction/llms.txt). Markdown versions of documentation pages are available by appending `.md` to page URLs; this page is available as [Markdown](https://docs.k3-labs.com/introduction/k3-agents/creating-agents.md).
# Creating Agents
Transform your workflows into shareable, reusable agents that others can deploy with just a few clicks. This guide walks you through the agent creation process, from workflow to published agent.
### Getting Started
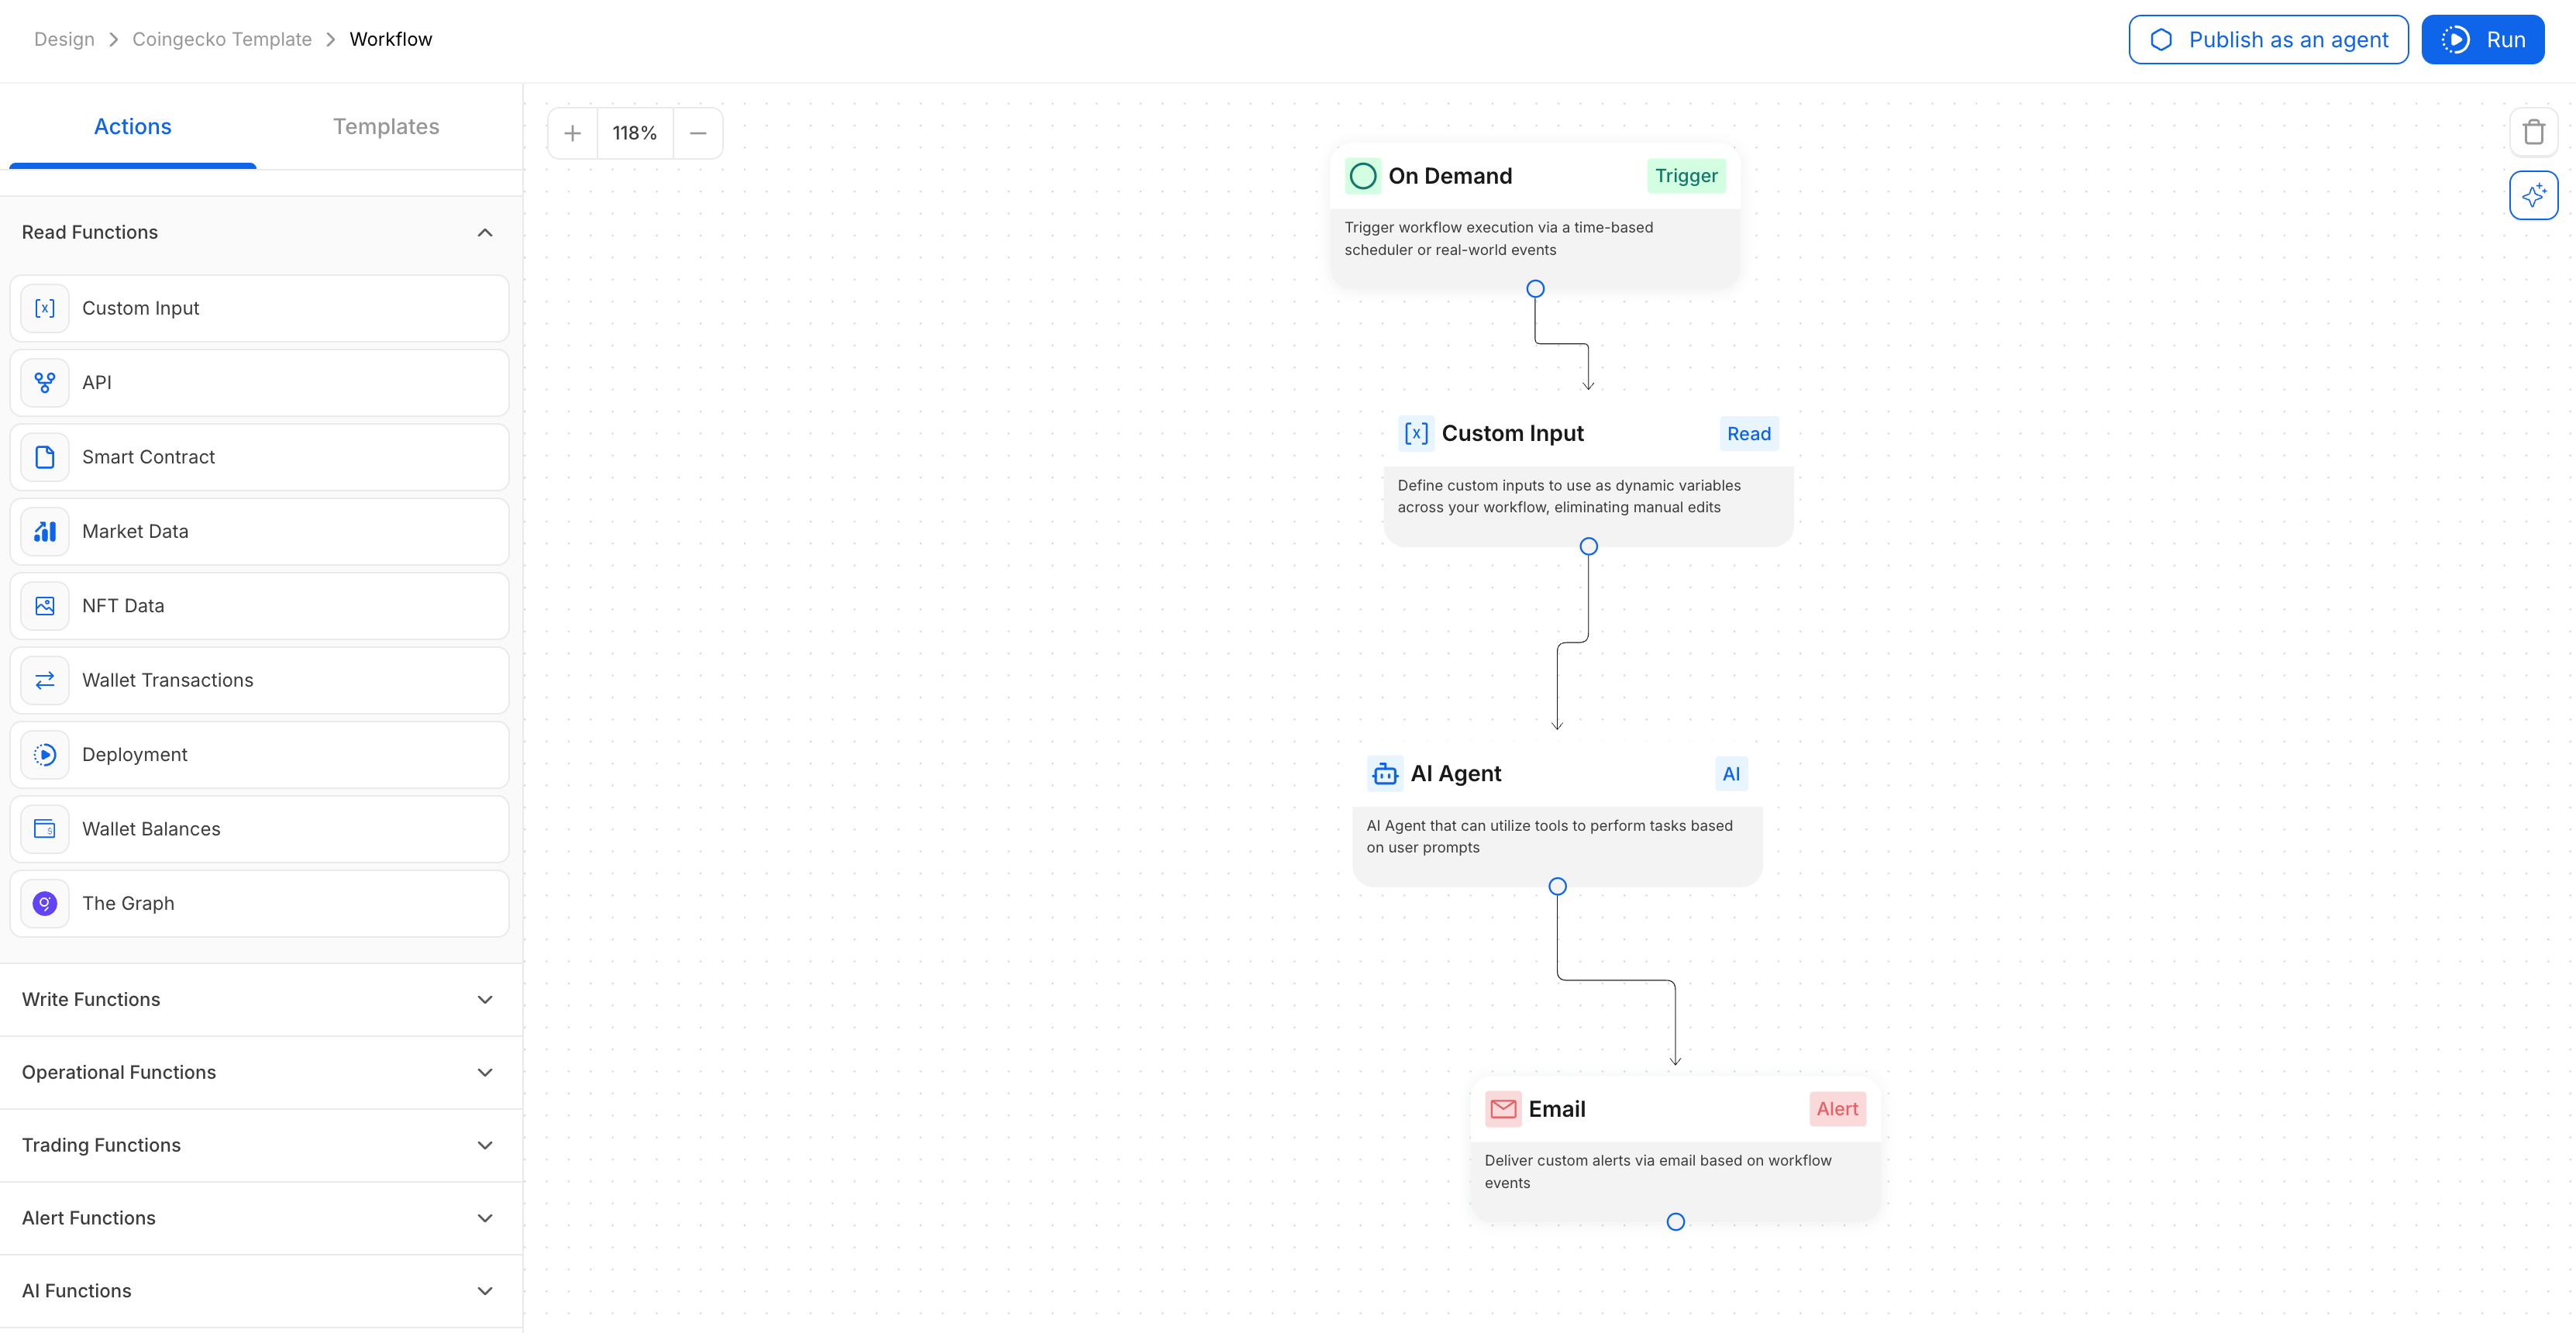
To create an agent, you need an existing workflow. Once you've built and tested your workflow, look for the "Publish as an agent" button in the top right corner of the workflow builder.
### The Three-Step Creation Process
#### Step 1: Configure User Inputs
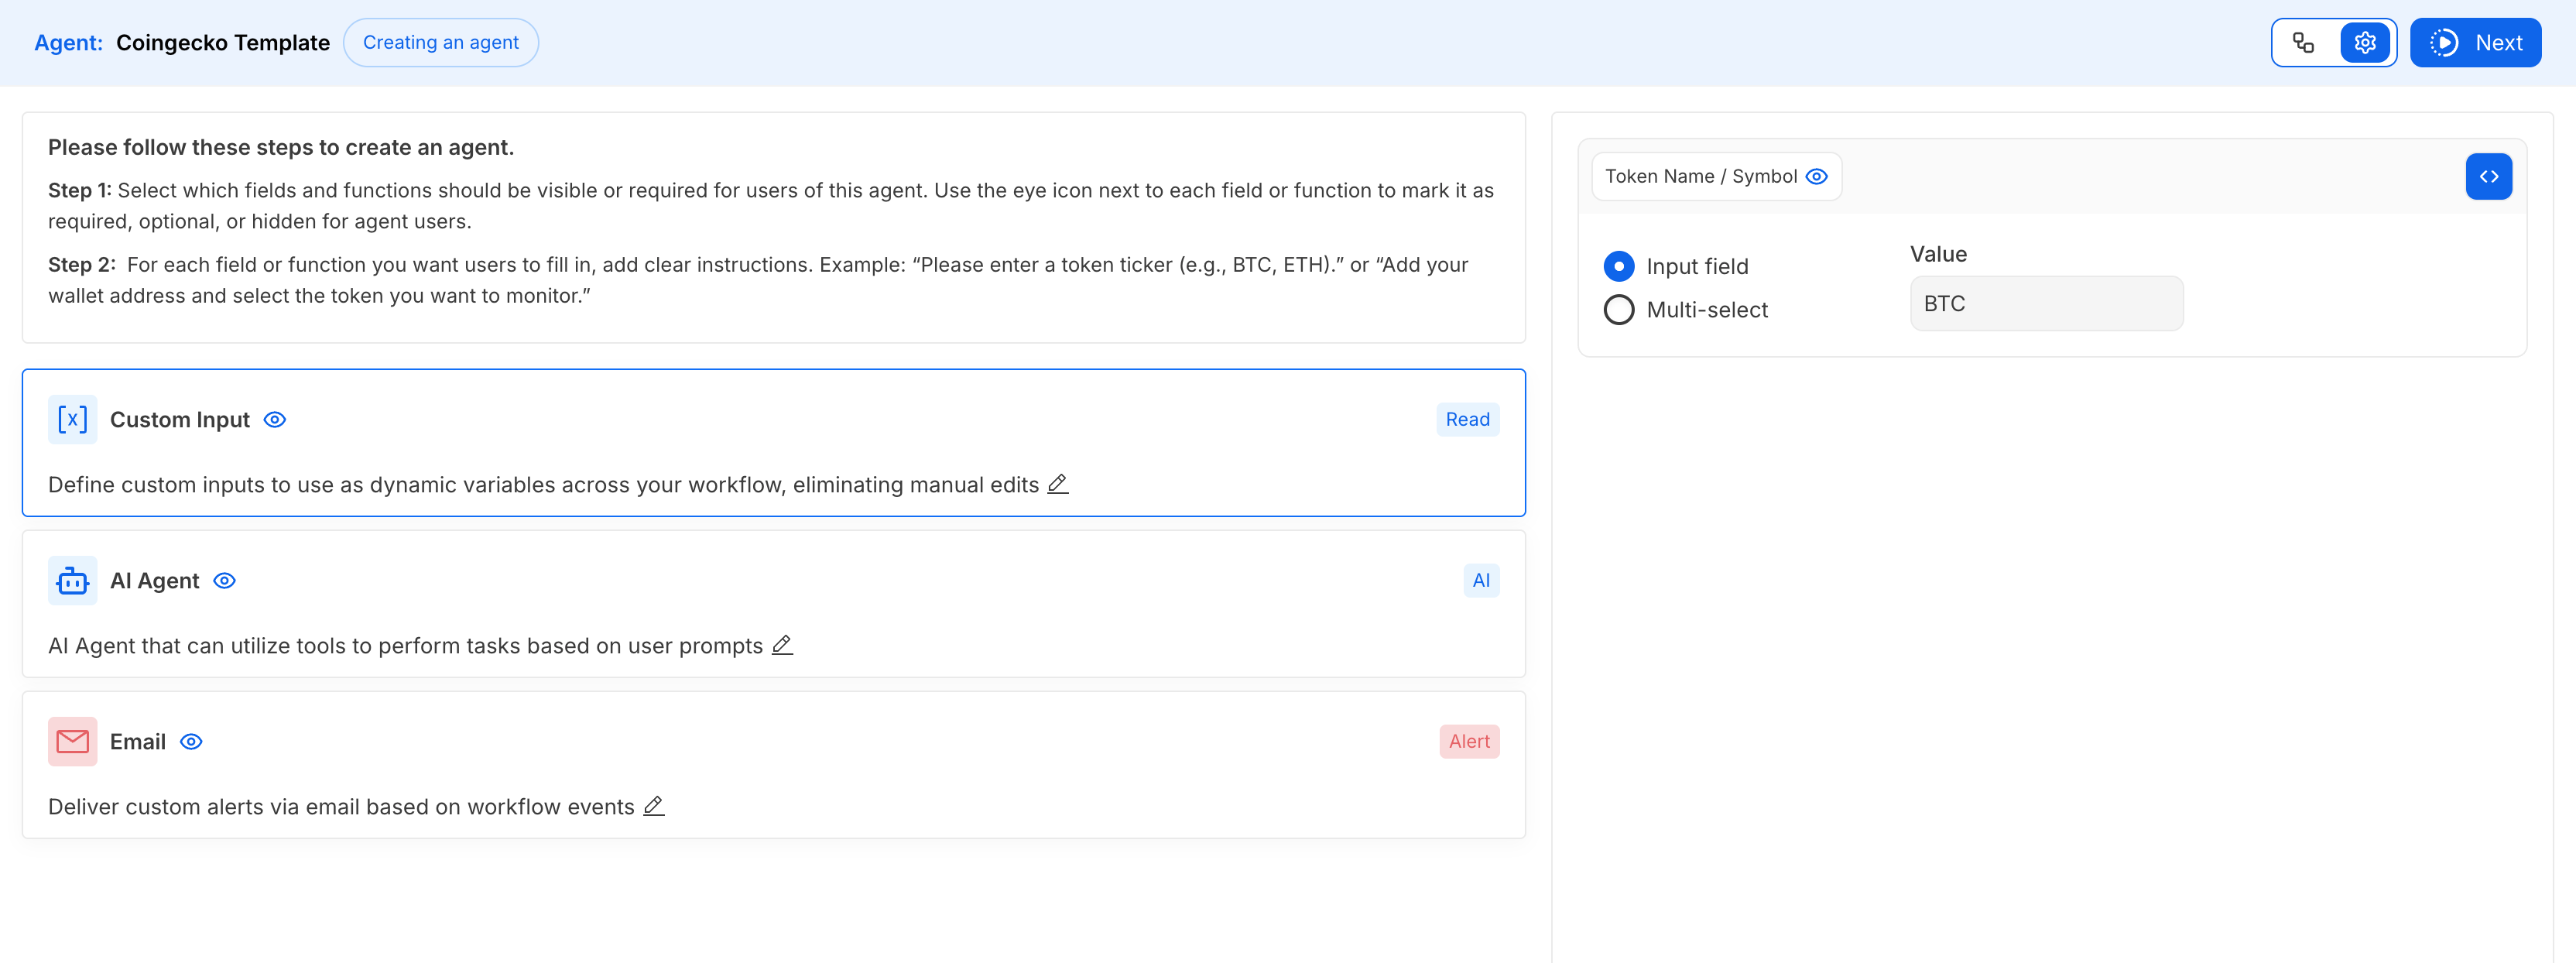
When you click "Publish as an agent," you'll enter the agent creation mode, indicated by:
* A blue bar at the top showing "Creating an agent"
* The title format: Agent: \[Your Workflow Name]
**Setting Visibility**
Your main task is to determine what users see and configure:
Hide/Show Functions
* Click the eye icon (👁) next to each function to hide entire functions users don't need to see
* Hidden functions still execute but won't appear in the agent interface
Configure Field Visibility
* Within visible functions, hide specific fields that should remain pre-configured
* Example: In an Email function, show only the "To" field while hiding pre-set subject and body
Add Clear Instructions
* Edit function descriptions to guide users
* Examples: "Enter your email address," "Add wallet address to monitor," "Select token to track"
**Using Custom Inputs**
Custom Inputs let you create user-friendly variables:
Input Field Type
* Simple text input for values like wallet addresses or email addresses
* Users type their value directly
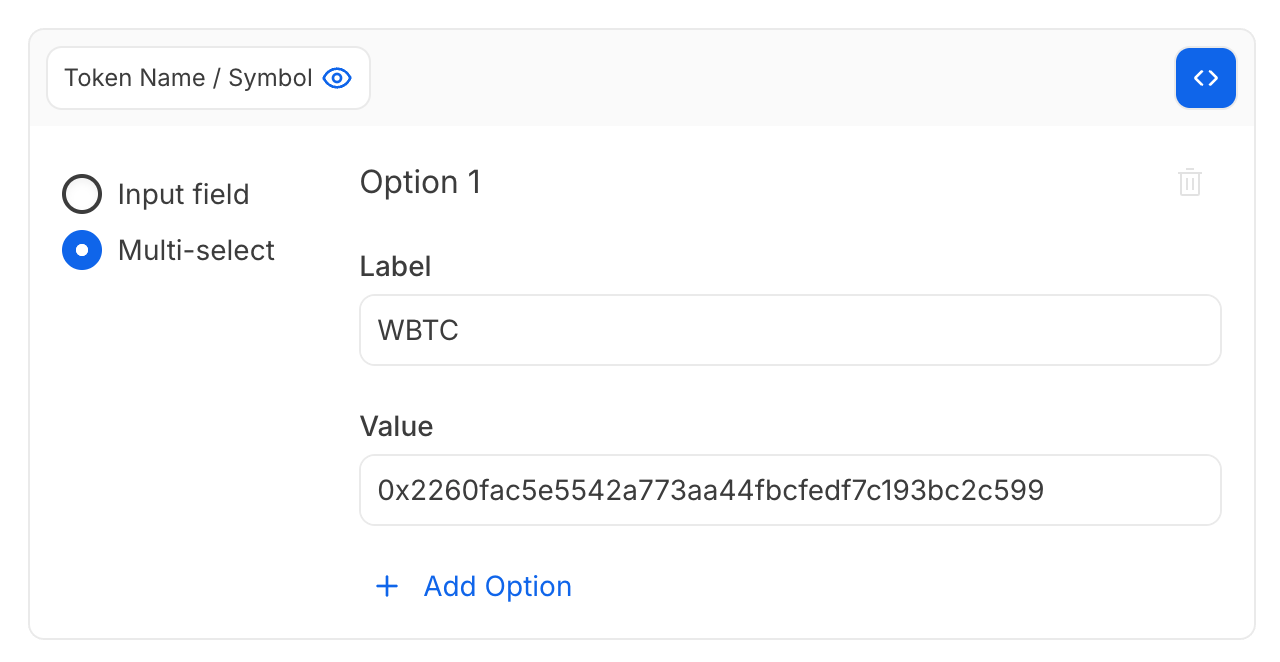
Multi-Select Type
* Pre-defined options users can choose from
* You set both the display label and the underlying value
* Example: Display "WBTC" but pass the contract address as the value
Important: Multi-select options can only be configured in Template View, not Workflow View
**Working with Two Views**
Template View (Default)
* Configure what users see
* Hide/show functions and fields
* Add descriptions and instructions
* Set up multi-select options
Workflow View
* Edit the underlying workflow logic
* Access via the toggle switch in the top right
* Make functional changes to your automation
**Security Best Practices**
* Remove private information before publishing (personal emails, API keys, etc.)
* Wallet and chat integrations automatically reset for each user
* Test thoroughly to ensure hidden logic works correctly
#### Step 2: Agent Details & Publishing
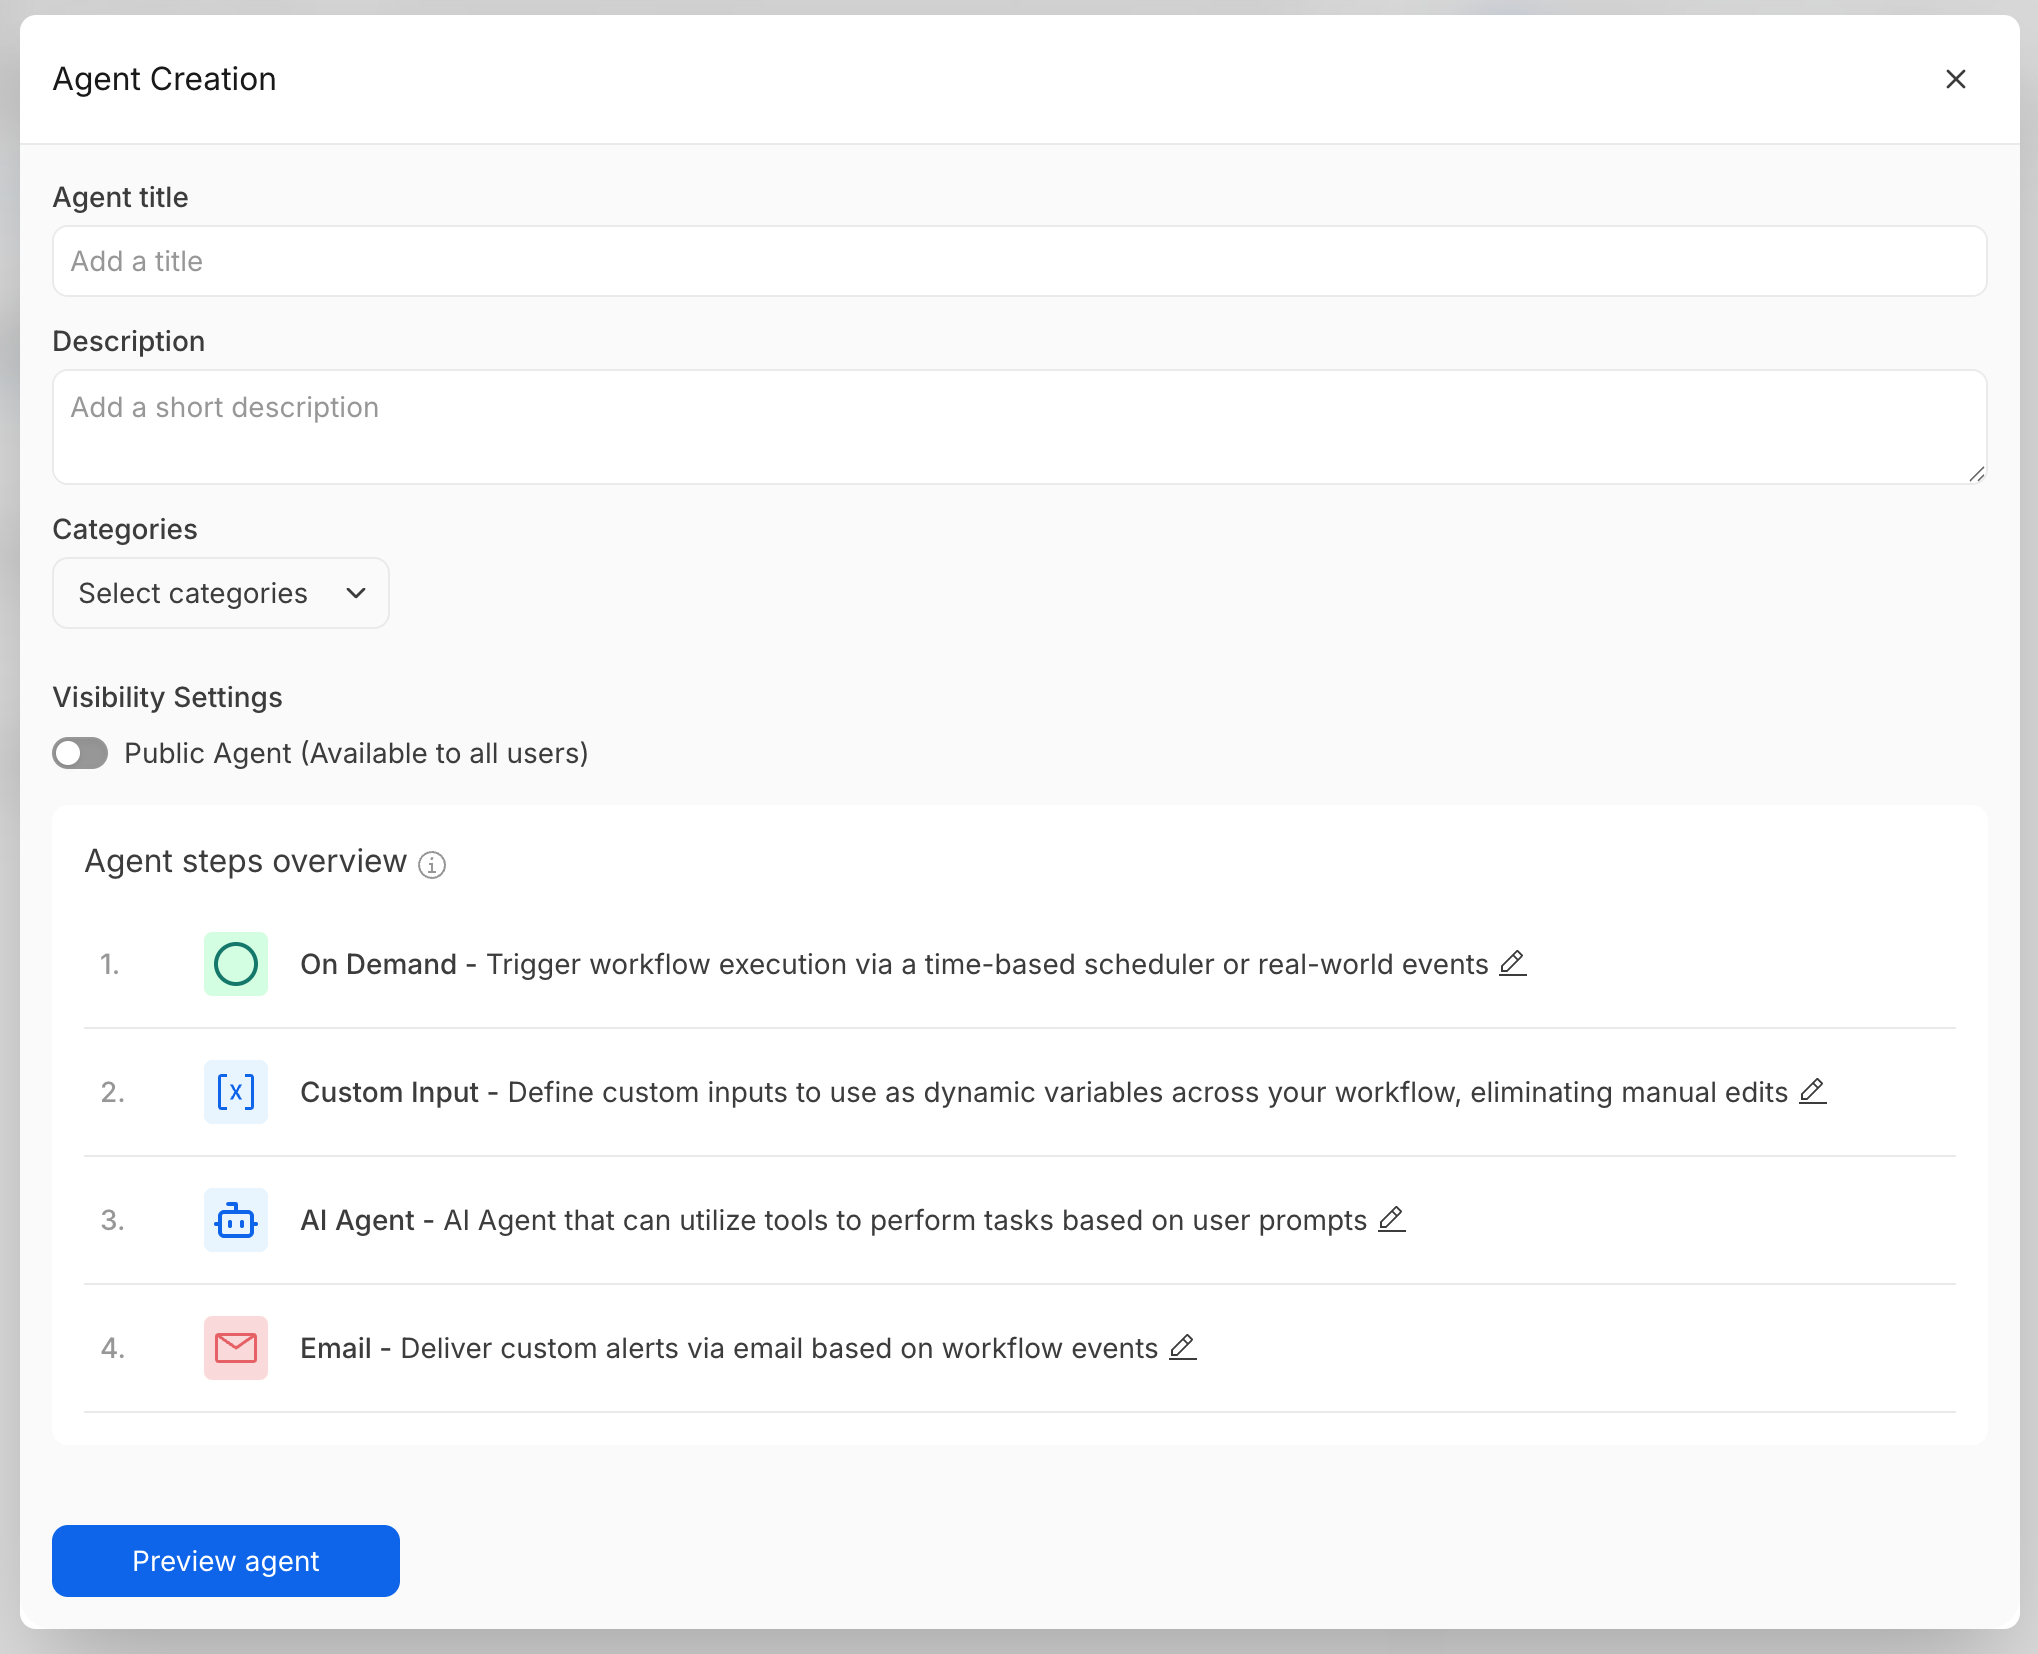
Click "Next" to proceed to the Agent Creation screen where you'll configure:
**Basic Information**
* Agent Title: Clear, descriptive name for your agent
* Description: Explain what your agent does and its value
* Categories: Select up to 3 relevant categories for discoverability
**Visibility Settings**
* Private Agent (Default): Only visible to you and your team
* Public Agent: Submitted for review and available to all users after approval
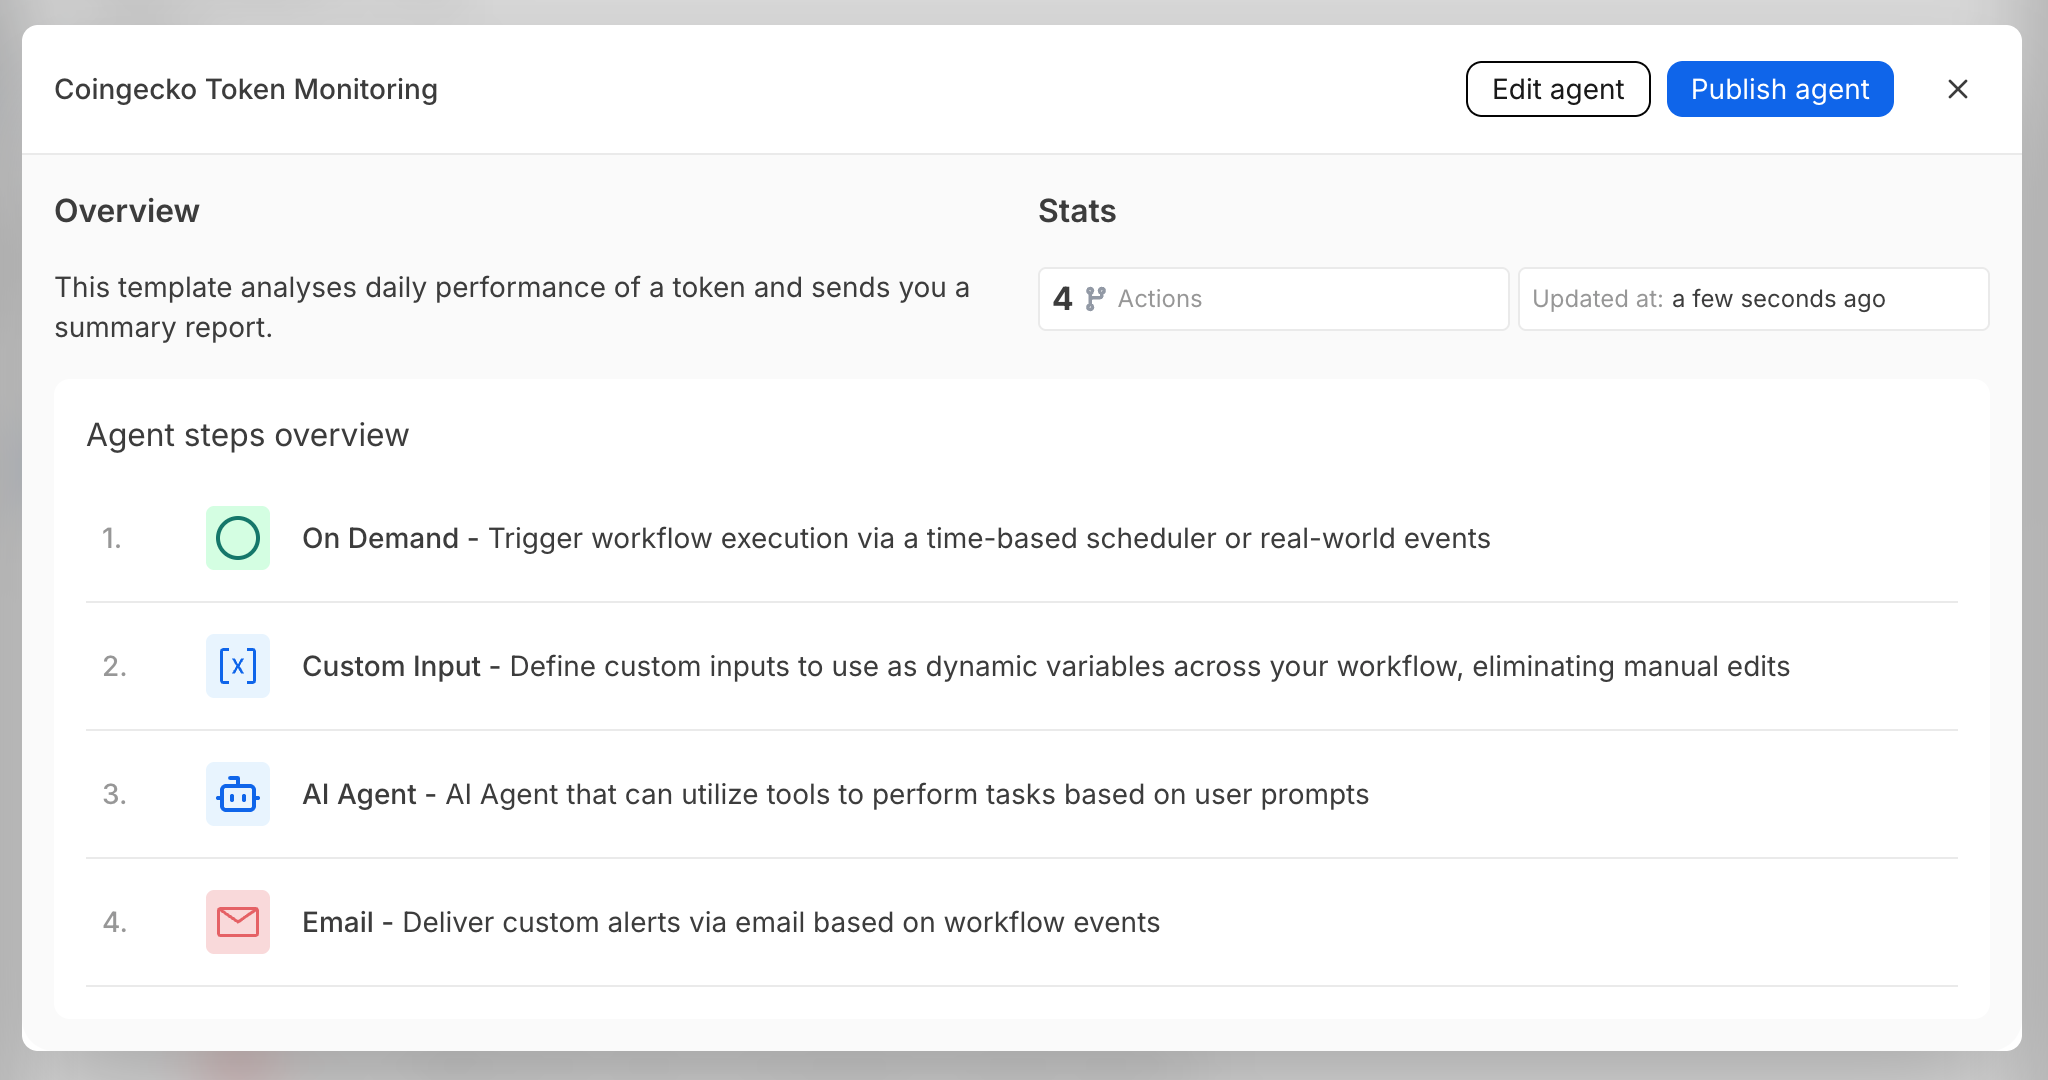
**Agent Steps Overview**
Edit the auto-generated step descriptions to clearly explain what each visible step does. This helps users understand your agent's workflow at a glance.
Tip: Write descriptions from the user's perspective, focusing on outcomes rather than technical details
#### Step 3: Preview & Publish
After clicking "Preview agent", you'll see exactly what users will experience:
* Review the agent interface
* Test the input fields
* Verify descriptions are clear
* Check that sensitive information is hidden
When satisfied, click "Publish" to:
* Save as a private agent (immediate)
* Submit for public review (requires approval)
### Managing Your Published Agents
#### Accessing Your Agents
You can view and manage all agents you've created from your agent management dashboard. Each agent displays:
* Usage statistics
* Current status (private/public/under review)
* Management options
#### Editing Agents
To modify an existing agent:
1. Click the "Edit" button on your agent
2. Make any necessary changes to:
3. * Agent configuration and visibility settings
* Workflow logic and functions
* Title, description, or categories
4. Republish with your changes
Important Notes:
* Editing creates a new version of your agent
* Public agents require re-approval after editing
* Existing users are unaffected - they continue using the version they deployed
#### Deleting Agents
To remove an agent:
1. Click the "Delete" button on your agent
2. Confirm the deletion
What happens when you delete:
* The agent is removed from the gallery
* New users cannot discover or deploy it
* Existing users are unaffected - their deployed workflows continue running normally
Version Stability: Both editing and deleting agents maintain version stability. Users who have already deployed your agent will continue using their version without interruption.
### Best Practices for Agent Creators
#### Design for Simplicity
* Minimize required inputs
* Use descriptive labels
* Provide default values where possible
* Group related inputs logically
#### Write Clear Documentation
* Use the description field to explain the agent's purpose
* Add helpful hints in function descriptions
* Consider common use cases in your examples
* Specify any prerequisites or requirements
#### Test Before Publishing
* Run the workflow with various inputs
* Verify error handling works correctly
* Ensure hidden logic executes properly
* Test with minimal user inputs
#### Consider Your Users
* Think about non-technical users
* Avoid jargon in descriptions
* Provide examples in your instructions
* Make error messages helpful
### Common Agent Patterns
#### Monitoring Agents
* Show: Wallet/contract addresses, alert thresholds, notification preferences
* Hide: Data processing logic, complex calculations, API configurations
#### Trading Agents
* Show: Trading pairs, amounts, price limits
* Hide: Exchange connections, trading algorithms, risk calculations
#### Analytics Agents
* Show: Data sources, report frequency, delivery method
* Hide: AI prompts, data transformation, formatting logic
### Next Steps
{% content-ref url="/pages/S8emGdCDPYiuiauOAEZw" %}
[Using Agents](/introduction/k3-agents/using-agents.md)
{% endcontent-ref %}