> For the complete documentation index, see [llms.txt](https://docs.k3-labs.com/introduction/llms.txt). Markdown versions of documentation pages are available by appending `.md` to page URLs; this page is available as [Markdown](https://docs.k3-labs.com/introduction/k3-agents/using-agents.md).
# Using Agents
Discover and deploy powerful automation agents created by the K3 Labs community. This guide shows you how to find, configure, and manage agents for your automation needs.
### Finding Agents
#### Browse the Agent Gallery
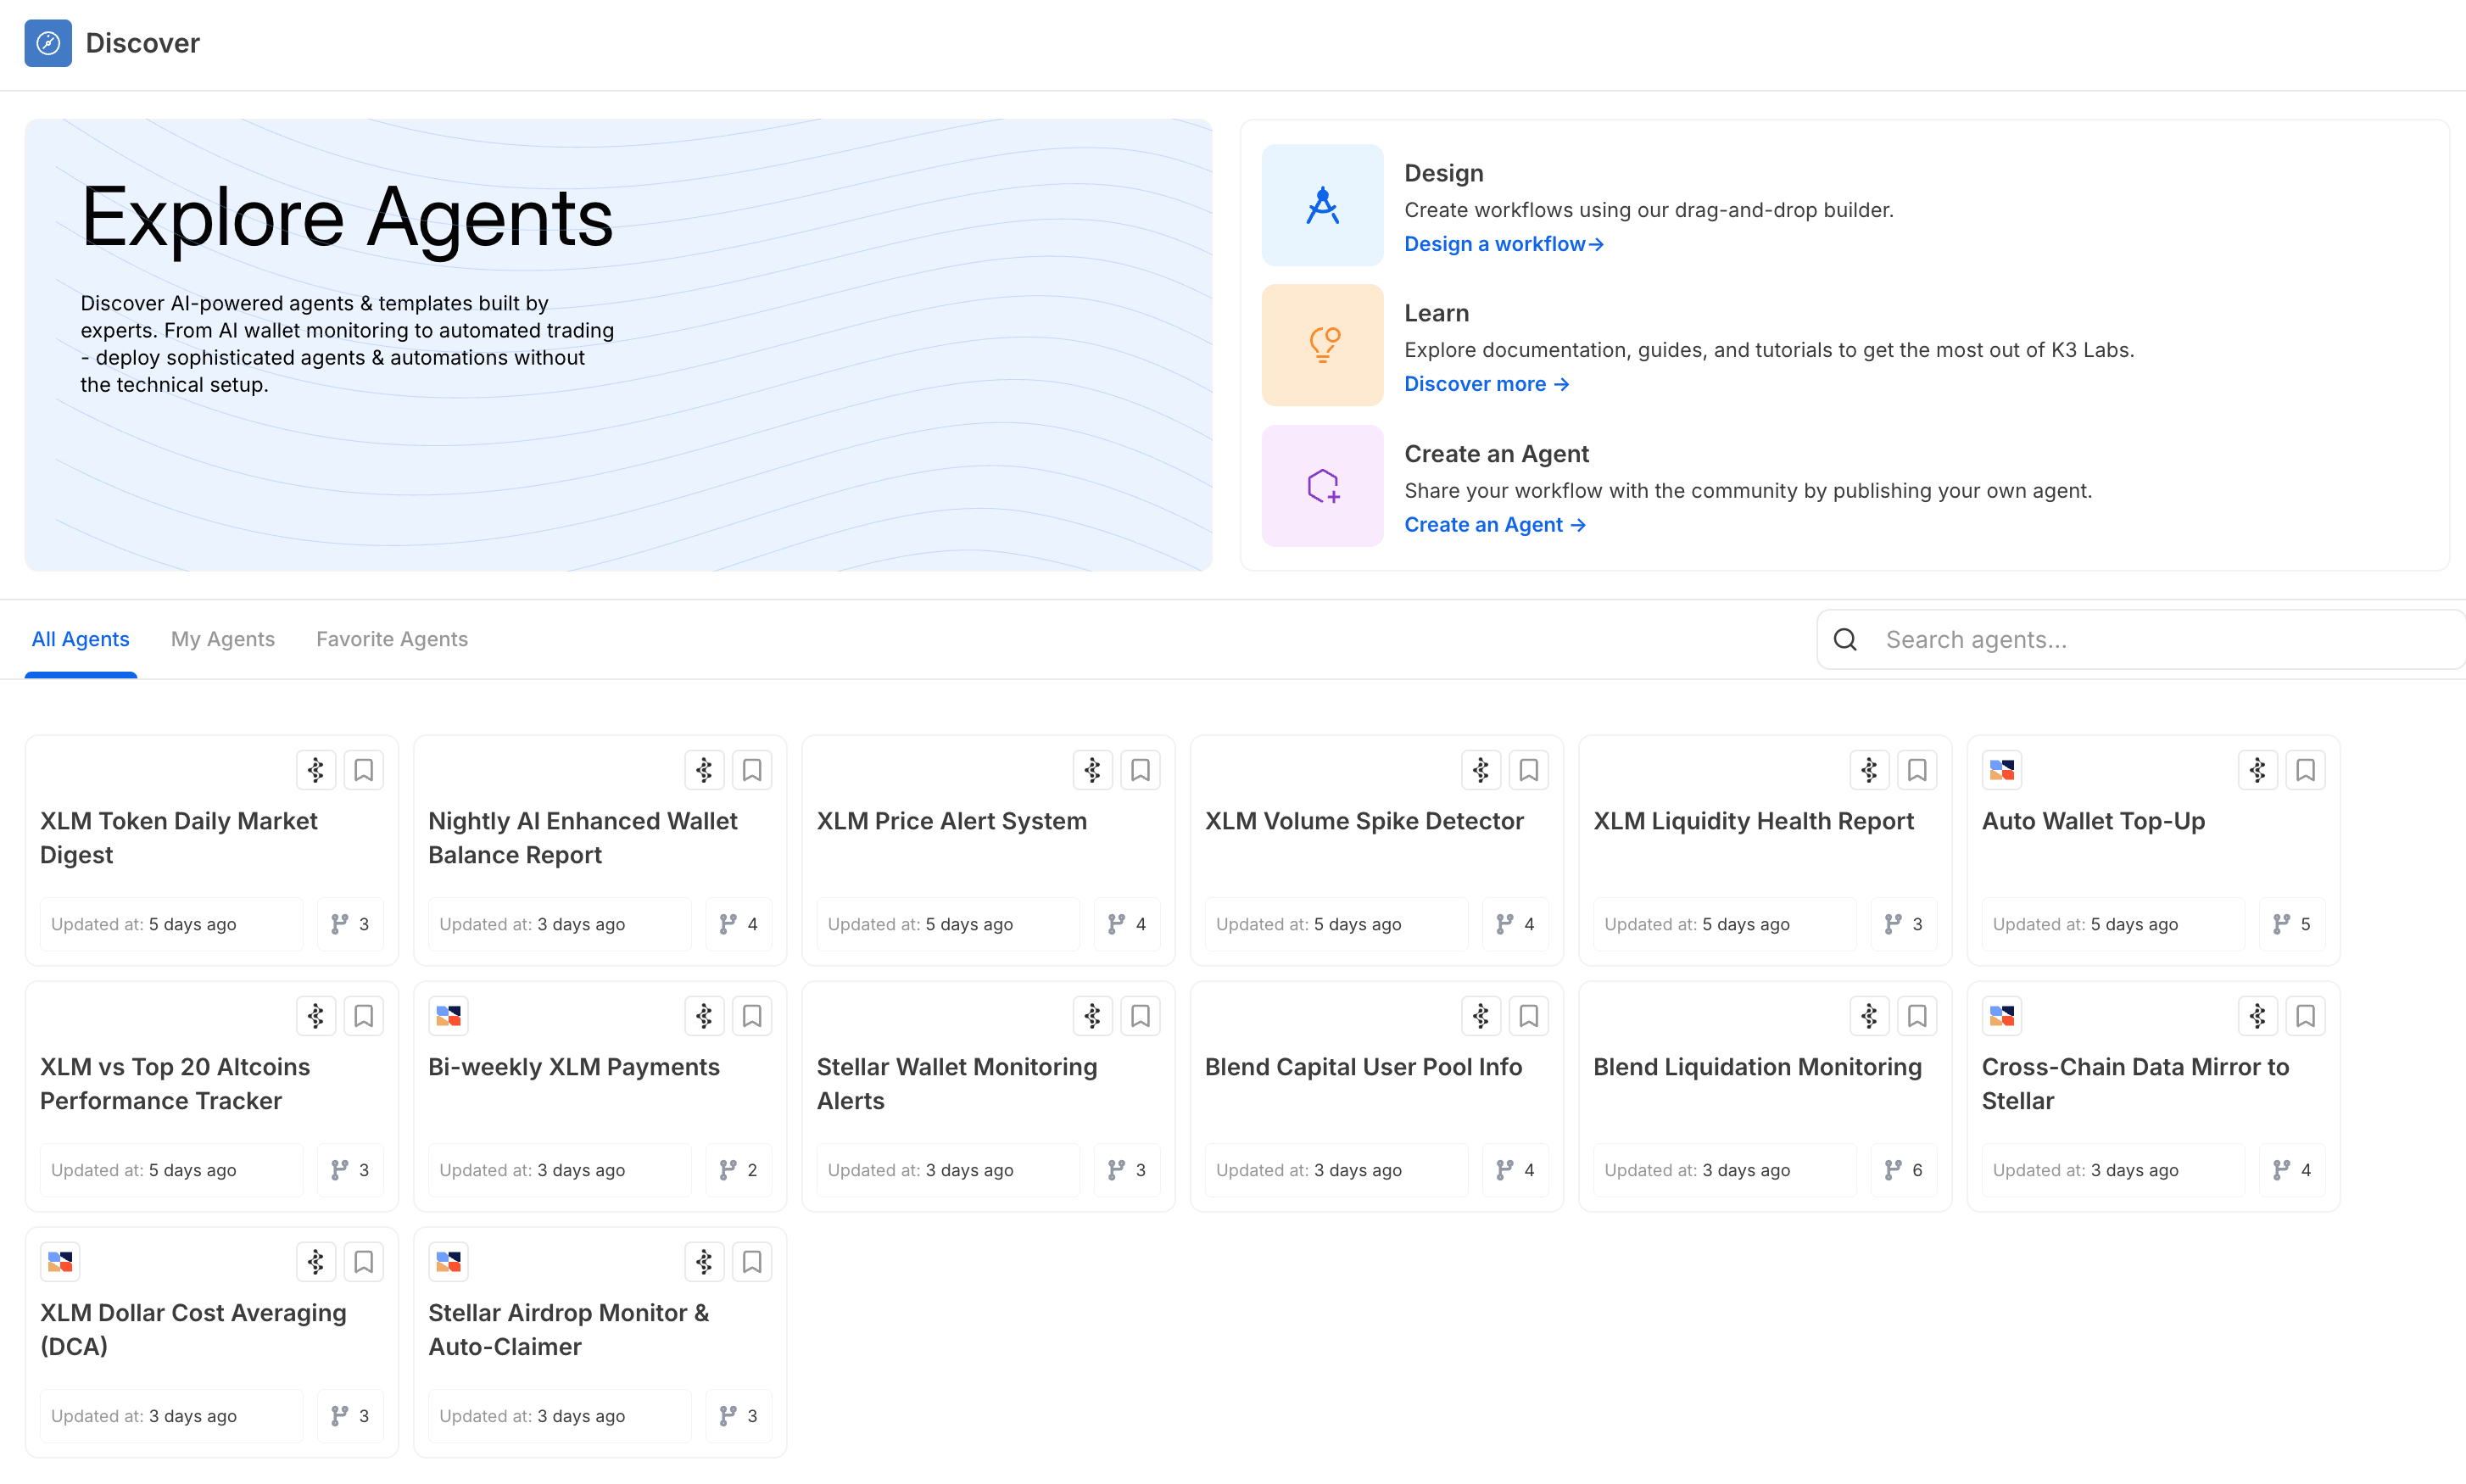
The Discover page is your gateway to all available agents:
* All Agents: Browse the complete collection of public agents
* My Agents: View agents you've created or deployed
* Favorite Agents: Quick access to agents you've saved
* Search: Find specific agents by name or function
* Categories: Filter agents by use case (Finance, Operations, AI Agents, etc.)
#### Agent Cards Display
Each agent card shows:
* Agent name and type (Official/Community)
* Brief description
* Update timestamp
* Action count (number of steps)
* Creator badge (for official agents)
#### Direct Links
Agents can also be shared directly via links. Click any shared agent link to view and deploy it instantly.
### Understanding Agent Details
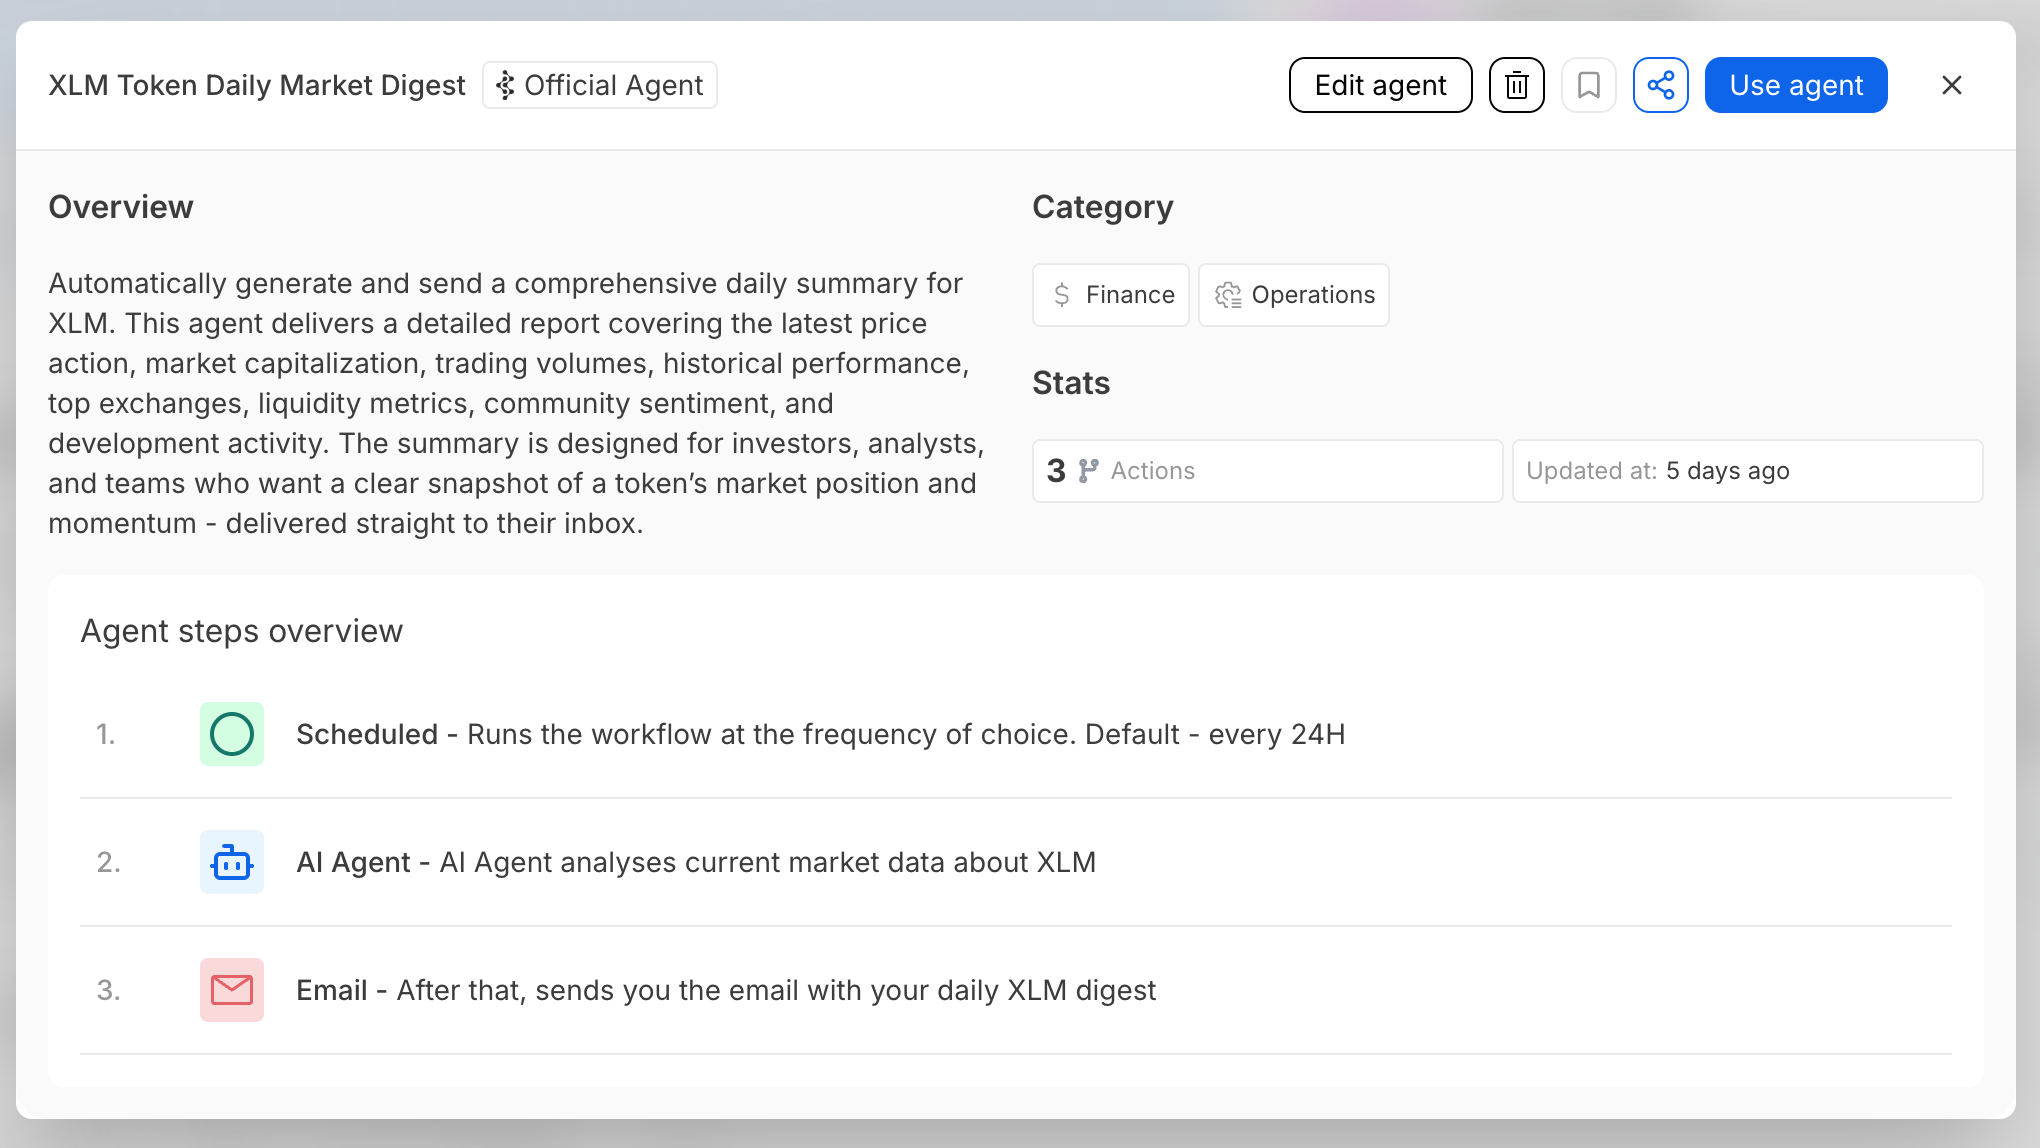
When you click on an agent, you'll see a comprehensive preview:
#### Overview Section
* Description: Detailed explanation of what the agent does
* Use Cases: Who should use this agent and why
* Requirements: Any prerequisites or necessary accounts
#### Categories
Tags that help you understand the agent's primary functions (e.g., Finance, Operations, AI Agents)
#### Statistics
* Actions: Number of workflow steps in the agent
* Last Updated: When the agent was last modified
* Usage Count: How many times it's been deployed (when available)
#### Agent Steps Overview
A high-level view of what the agent does:
1. Each step is numbered and shows its function type
2. Descriptions explain what happens at each stage
3. Only visible steps are shown (hidden logic remains private)
### Deploying an Agent
#### Step 1: Click "Use Agent"
When ready to deploy, click the blue "Use agent" button. This opens the configuration interface.
#### Step 2: Configure Required Inputs
You'll only see fields that need your input:
Common Input Types:
* Schedule Settings: Choose frequency (hourly, daily, weekly, etc.)
* Contact Information: Email addresses or Telegram handles for alerts
* Wallet Addresses: Addresses to monitor or interact with
* Thresholds: Price limits, percentages, or other numeric values
* Token Selection: Choose from pre-configured options
Example Configuration:
Scheduled: Every 24 Hours
Email:
#### Step 3: Preview the Workflow (Optional)
Toggle to Workflow View to see the complete automation logic:
* Understand the full process flow
* Verify the steps match your expectations
* Note: This view is read-only
#### Step 4: Deploy
1. Click the "Deploy" button
2. Give your agent instance a memorable name
3. Confirm deployment
Your agent is now active and will run according to your configuration!
### Managing Deployed Agents
#### Access Your Agents
Find all your deployed agents in the Dashboard:
* View running status
* Monitor execution history
* Check for any errors
#### Edit Configuration
Need to change settings? You can update your deployed agents:
1. Navigate to your agent in the Dashboard
2. Click to open the agent
3. Modify any configurable fields
4. Save changes
Changes take effect immediately for future executions.
#### Pause or Stop Agents
Control your agents directly from the Dashboard:
* Pause: Temporarily stop execution while keeping configuration
* Delete: Permanently remove the agent instance
### Tips for Success
#### Before Deploying
* Read the full description to understand the agent's purpose
* Check the steps overview to verify it matches your needs
* Ensure you have necessary accounts (wallets, APIs, etc.)
* Start with conservative settings (lower frequencies, higher thresholds)
#### Common Configurations
Monitoring Agents
* Set reasonable check intervals to balance timeliness and action usage
* Use specific wallet addresses rather than monitoring everything
* Configure alert thresholds to avoid notification overload
Trading Agents
* Start with small amounts to test behavior
* Set appropriate price limits and slippage tolerance
* Ensure your wallet has sufficient funds for gas
Analytics Agents
* Choose report frequencies that match your decision-making cadence
* Select relevant data sources and metrics
* Configure delivery to your preferred communication channel
#### Troubleshooting
Agent Not Running?
* Check if you've completed all required fields
* Verify your wallet has funds for gas (if applicable)
* Ensure external services (email, Telegram) are properly connected
Not Receiving Alerts?
* Confirm email address is correct
* Check spam folders
* Verify Telegram bot connection
Unexpected Behavior?
* Review the workflow view to understand logic
* Check if thresholds or conditions are too restrictive
* Contact the agent creator for complex issues
### Best Practices
#### Start Simple
* Deploy one agent at a time
* Use default settings initially
* Gradually adjust based on results
#### Monitor Performance
* Check execution logs regularly
* Track action usage
* Optimize schedules based on actual needs
#### Security Considerations
* Only enter information you're comfortable sharing
* Verify official agents have the official badge
* Review agent logic before entering sensitive data
* Remember that wallet connections are always secure and isolated
### Next Steps: Learn how to build your own agents
{% content-ref url="/pages/JNbze6Lbbb626oQDWeGj" %}
[Creating Agents](/introduction/k3-agents/creating-agents.md)
{% endcontent-ref %}